DIY Home Network with OpenBSD, OpenWrt, and Pi-hole
2026-03-03
This post includes a full breakdown of my entire home network stack. My goal is to make this as accessible as possible for newcomers to jump right in and build out their own home networks.
Please feel free to reach out if you notice any glaring issues or security oversights!
TL;DR
| Device | Usage | Cost |
|---|---|---|
| Fanless Industrial Mini PC | OpenBSD Router | $100 |
| D-Link DIR-878 | OpenWrt Access Point | $35 |
| Raspberry Pi Zero v1.2 | Pi-hole | $15 |
          [ISP Modem]
               |
               |
      (WAN Ethernet cable)
               |
               |
        [OpenBSD Router]
             /   \
            /     \
 (LAN Ethernet)  (LAN Ethernet)
        /             \
  [OpenWrt AP]      [Pi-hole]
OpenBSD Router
Device Specs
You can find the same machine I am currently using as my OpenBSD router here: AliExpress. I have the 4GB RAM variation, but I am unsure if that model is still available. Almost any device with multiple network ports should work fine though!
I’m not going to walk through the entire install process for setting up OpenBSD. The built-in installer is actually quite good and going with the defaults on most configuration options is a safe bet. Make sure your device’s main/first ethernet port is connected to your ISP’s modem. This will make autoconfiguring your network much easier in the next steps.
All the programs we will be using are built into the base OpenBSD install except for miniupnpd. You will need to install that separately:
doas pkg_add miniupnpd
For reference, here are the neofetch stats of my own router to compare against your own hardware:
OS: OpenBSD 7.8 amd64
Host: INTEL J1900
Packages: 63 (pkg_info)
CPU: Intel Celeron N2840 (2) @ 2.159GHz
Memory: 46MiB / 3948MiB
With the router setup and running, test that your internet connection is working by running the following in the terminal:
ping openbsd.org
You should see something similar to:
PING openbsd.org (199.185.178.80) 56(84) bytes of data.
64 bytes from 199.185.178.80: icmp_seq=1 ttl=240 time=101 ms
64 bytes from 199.185.178.80: icmp_seq=2 ttl=240 time=123 ms
64 bytes from 199.185.178.80: icmp_seq=3 ttl=240 time=64.4 ms
...
Nice work!
pf.conf
Now our very first step is creating and building out our pf.conf file. Using your editor of choice (I recommend vim, which you can install via doas pkg_add vim) make a new file located at /etc/pf.conf.
The contents of the /etc/pf.conf config file:
ext_if  = "igc0" # Internet modem (incoming)
int_if  = "igc1" # OpenWrt DLink
int2_if = "igc2" # Pi-hole

set skip on lo

anchor "miniupnpd"

# Block everything by default
block all

# NAT rules
match out on $ext_if from 192.168.1.0/24 to any nat-to ($ext_if)
match out on $ext_if from 192.168.2.0/24 to any nat-to ($ext_if)

# Normalize incoming packets
match in on $ext_if scrub (no-df random-id max-mss 1440)

# Protect against spoofing
antispoof quick for { lo $int_if $int2_if }

# Allow LAN clients to initiate connections to router
pass in on $int_if
pass in on $int2_if

pass out on $int_if from any to 192.168.1.0/24
pass out on $int2_if from any to 192.168.2.0/24

# Allow all outbound traffic (router + LAN)
pass out on $ext_if keep state
That’s the entire router config. Beautifully simple, right?
igc0, etc) might differ on your machine. Be sure to double check the naming of your network ports by running ifconfig.
Let’s breakdown each block for better understanding of what’s going on.
ext_if  = "igc0" # Internet modem (incoming)
int_if  = "igc1" # OpenWrt DLink
int2_if = "igc2" # Pi-hole
- Interface Aliases
- Here we give human-readable names to the three network interfaces (for my personal router I’m only using 3 out of the 4 available ethernet ports).
igc0is the WAN-facing interface connected to the internet modem,igc1connects to an OpenWrt D-Link router (more on that later) managing the primary LAN, andigc2connects to a Pi-hole for network-wide ad blocking. Naming them makes these easier further down in the config file.
set skip on lo
- Skipping the Loopback
- This tells
pfto ignore the loopback interface (lo0). There’s no point filtering traffic that never leaves the router itself (avoids unnecessary overhead).
anchor "miniupnpd"
- MiniUPnP Anchor
- MiniUPnP is the daemon that handles automatic port forwarding for certain applications (gaming consoles, torrents etc.). This is sometimes looked at as a minor security risk, so you don’t need to include it. Just be aware that if you decide to remove MiniUPnP, you’ll be required to manually configure NAT settings for connected devices (which I can’t be bothered to do…)
block all
- Default Deny
block allis the meat and potatoes of the whole firewall. We deny everything unless explicitly permitted. This “default deny” philosophy means a mis-configured or missing rule fails safely rather than accidentally allowing unwanted traffic through.
match out on $ext_if from 192.168.1.0/24 to any nat-to ($ext_if)
match out on $ext_if from 192.168.2.0/24 to any nat-to ($ext_if)
- NAT for Both LANs
- The two
match outNAT rules handle address translation for both of our subnets. When traffic from the primary LAN (192.168.1.0/24) or the Pi-hole LAN (192.168.2.0/24) heads out to the internet,pfrewrites the source address to our router’s public IP, so returning traffic knows how to find its way back.
match in on $ext_if scrub (no-df random-id max-mss 1440)
- Packet Normalization
match in on $ext_if scrubcleans incoming packets from the internet before they’re processed further. It strips the “don’t fragment” flag, randomizes IP IDs to make the firewall harder to fingerprint, and clamps the max segment size to 1440 bytes to stop fragmentation issues (common with PPPoE or VPN tunnels).
antispoof quick for { lo $int_if $int2_if }
- Anti-Spoofing
antispoof quick for { lo $int_if $int2_if }blocks packets that arrive on an interface but claim to originate from an address that should only appear on a different interface. This prevents IP spoofing attacks where a “bad actor” tries to impersonate a trusted internal address.
pass in on $int_if
pass in on $int2_if
- Allowing Inbound LAN Traffic
pass in on $int_ifandpass in on $int2_ifallow both internal networks to send traffic to the router. This includes things like DNS queries, gateway pings, or management access. Without these, our default deny would silently drop everything from our own local devices.
pass out on $int_if from any to 192.168.1.0/24
pass out on $int2_if from any to 192.168.2.0/24
- Routing Replies Back to Each LAN
- These two
pass outrules on the internal interfaces ensure that traffic going to each subnet can actually leave the router towards the right network. These are the return paths that make the whole setup work as an actual router. Pretty important!
pass out on $ext_if keep state
- Allowing Outbound Internet Traffic
- Finally,
pass out on $ext_if keep stateopens up all outbound internet traffic. Thekeep statepart is the key. This tellspfto remember each connection so that reply packets are automatically allowed back in, without needing a separate inbound rule for every possible response.
That’s everything on the pf.conf side of things! Next we move on to dhcpd.conf.
dhcpd.conf
Next, we need to setup a very simple dhcp configuration. Create or edit the file found at /etc/dhcpd.conf
The /etc/dhcpd.conf config file:
# default
subnet 192.168.1.0 netmask 255.255.255.0 {
  range 192.168.1.100 192.168.1.199;
  option routers 192.168.1.1;
  option domain-name-servers 192.168.1.1;
}

# Pi-hole
subnet 192.168.2.0 netmask 255.255.255.0 {
  option routers 192.168.2.1;
  option domain-name-servers 192.168.2.1;
  range 192.168.2.100 192.168.2.150;
}

host pihole {
  hardware ethernet 00:e0:4c:36:01:2b;
  fixed-address 192.168.2.100;
}
There isn’t much to explain here. This config just sets our default subnet, along with a custom one for the Pi-hole. Below that we set a custom IP for our Pi-hole which will be used in our unbound configuration file for our network’s custom DNS.
unbound.conf
The /var/unbound/etc/unbound.conf config file:
server:
    interface: 192.168.1.1
    interface: 192.168.2.1
    access-control: 192.168.1.0/24 allow
    access-control: 192.168.2.0/24 allow
    do-ip6: no
    verbosity: 1
    hide-identity: yes
    hide-version: yes
    harden-glue: yes
    harden-dnssec-stripped: yes
    use-caps-for-id: yes
    prefetch: yes

forward-zone:
    name: "."
    #forward-addr: 192.168.2.100
    forward-addr: 9.9.9.9
Again, let’s breakdown each block for better understanding of what’s going on.
interface: 192.168.1.1
interface: 192.168.2.1
- Listening Interfaces
- Unbound binds to
192.168.1.1and192.168.2.1for the router’s addresses on each internal subnet. This means both the OpenWrt LAN and the Pi-hole LAN can reach the DNS resolver, but it’s never exposed on the WAN.
access-control: 192.168.1.0/24 allow
access-control: 192.168.2.0/24 allow
- Access Control
- The two access-control lines whitelist which networks are actually allowed to send queries. Both subnets get allow, and everything else is implicitly refused. Even if
unboundis somehow reachable from the outside, it won’t answer.
do-ip6: no
- IPv6 Disabled
- Turns off IPv6 DNS resolution entirely. If your setup doesn’t use IPv6 (like mine!), this keeps things simple and avoids any potential leakage through AAAA records or IPv6 transport.
verbosity: 1
- Verbosity
- Enables basic logging. Feel free to remove if not needed on your setup.
hide-identity: yes
hide-version: yes
- Identity and Version Hiding
- Stop
unboundfrom revealing its hostname and software version in response to id.server and version.bind queries.
harden-glue: yes
- Glue Hardening
- Tells
unboundto reject glue records that fall outside the delegated zone. I researched that this seals off a classic DNS attack where someone can try to slip in fake referral data. I’m no expert, but this was highly suggested through most documentation.
harden-dnssec-stripped: yes
- DNSSEC Strip Hardening
- Makes
unboundrefuse to fall back silently if DNSSEC signatures are stripped in transit. Without this, a man-in-the-middle could remove DNSSEC records andunboundwould quietly accept the unsigned response.
use-caps-for-id: yes
- 0x20 Bit Randomization
- 0x20 encoding trick that makes
unboundrandomly capitalize letters in outgoing queries and expects the same casing mirrored back. Another highly recommended rule that I found through my initial research.
prefetch: yes
- Prefetching
- Tells
unboundto refresh popular DNS records just before they expire, so frequently visited domains never go stale.
forward-zone:
    name: "."
    #forward-addr: 192.168.2.100
    forward-addr: 9.9.9.9
- Forward Zone
- The main function of
unboundfor our use case. Theforward-zoneblock with name: “.” means all queries get forwarded upstream. The first address192.168.2.100is the (commented out but soon to be setup) Pi-hole, so ad blocking happens before anything hits the public internet.9.9.9.9(Quad9) is setup as my personal fallback in case the Pi-hole is unreachable. Feel free to use any other DNS provider if you don’t like Quad9.
Bringing Everything Together
Now we just need to enable all these services to run on boot and start them in our current session:
doas pfctl -f /etc/pf.conf

doas rcctl enable dhcpd unbound
doas rcctl start dhcpd unbound
If everything was configured correctly, you should see no errors at all. Congrats!
Now it’s time to setup our WiFi access point.
OpenWrt Access Point
For my setup I’m using the D‑Link DIR‑878 AC1900 Wi‑Fi Router as my main access point. Any device that allows you to flash OpenWrt will work just fine, but I find the DIR-878 is pretty solid in terms of price and quality.
You’ll need to flash OpenWrt to your device, which is fairly straightforward for most devices. Therefore, we won’t be covering that in this tutorial. For reference, the documentation for flashing the DIR-878 can be found here.
Device Specs
- Model: AC1900 MU-MIMO Dual-Band Wi-Fi Gigabit Router (DIR-878)
- Processor: Dual-core MT7621A @ 880 MHz
- Memory: 128 MB DDR3 RAM, 16 MB Flash
- Antennas: 4 × external antennas (non-detachable)
Configuring AP-Only Mode
Once you device is properly flashed with OpenWrt, connect to it directly from a laptop or PC which is NOT connected to your local network. Make sure you connect to one of the DIR-878’s LAN ports, not the WLAN.
Navigate to 192.168.1.1 in your browser and login using the default creds (root with no password). Be sure to update your password on the first login.
The first step is to change the default IP of our AP, since we don’t want to cause conflicts with our existing OpenBSD router.
Navigate to Network > Interfaces and click Edit on the lan interface. Under the General Settings tab edit the following (if not already set automatically):
- IPv4 Address: 192.168.1.2
- IPv4 Netmask: 255.255.255.0
- IPV4 broadcast: 192.168.1.255
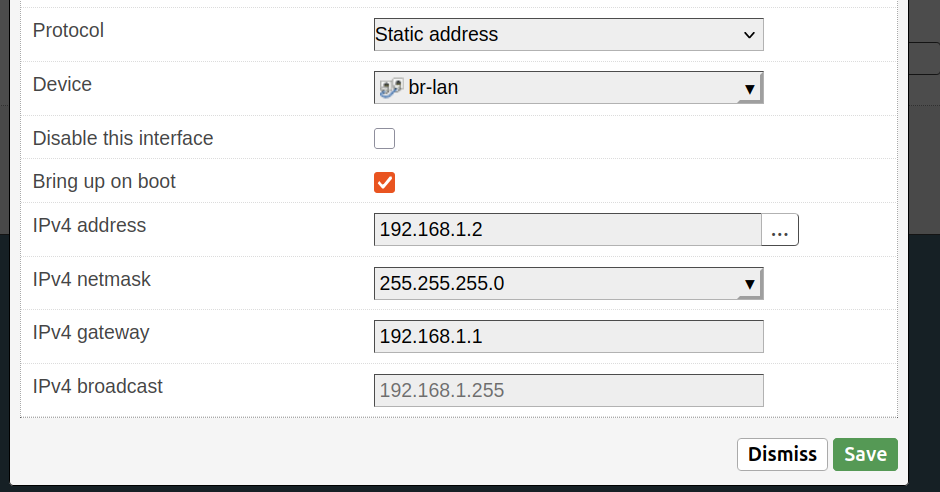
192.168.1.2, then reboot.Then navigate to the Advanced Settings tab under the same section and update the custom DNS to 192.168.1.1:
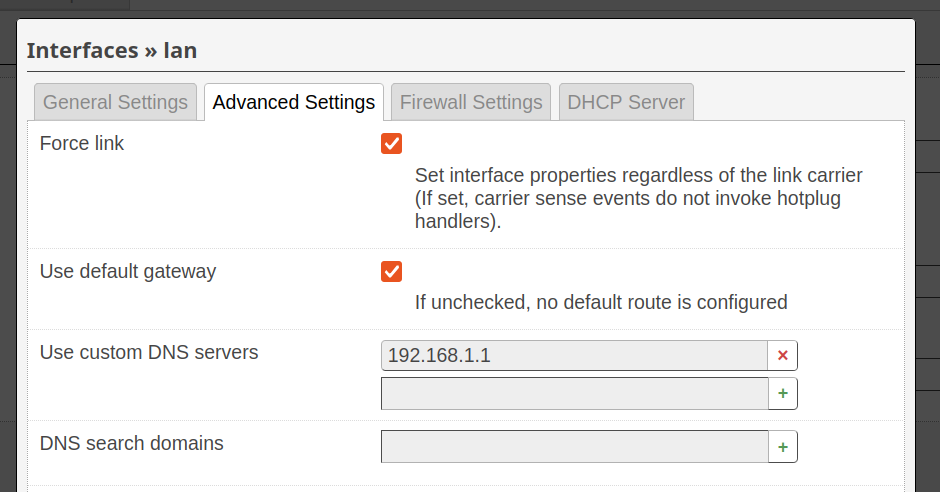
192.168.1.1)Finally, navigate to the DHCP Server tab and check the Ignore interface option, since DHCP will be handled by our OpenBSD router:
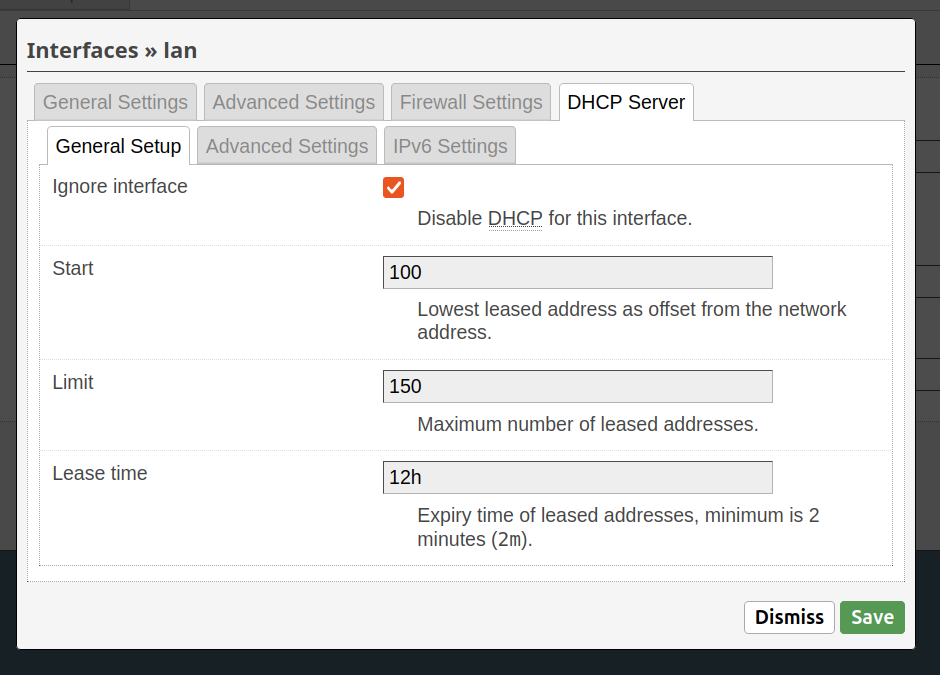
Save all your changes and then reboot the device.
Now to test things out! Connect the AP’s WLAN port to the second LAN port on your OpenBSD router. Keep your laptop/PC connected to the previous LAN port on the DIR-878. After is finishes rebooting, you should be able to login at the new IP: 192.168.1.2.
Now to setup the actual WiFi!
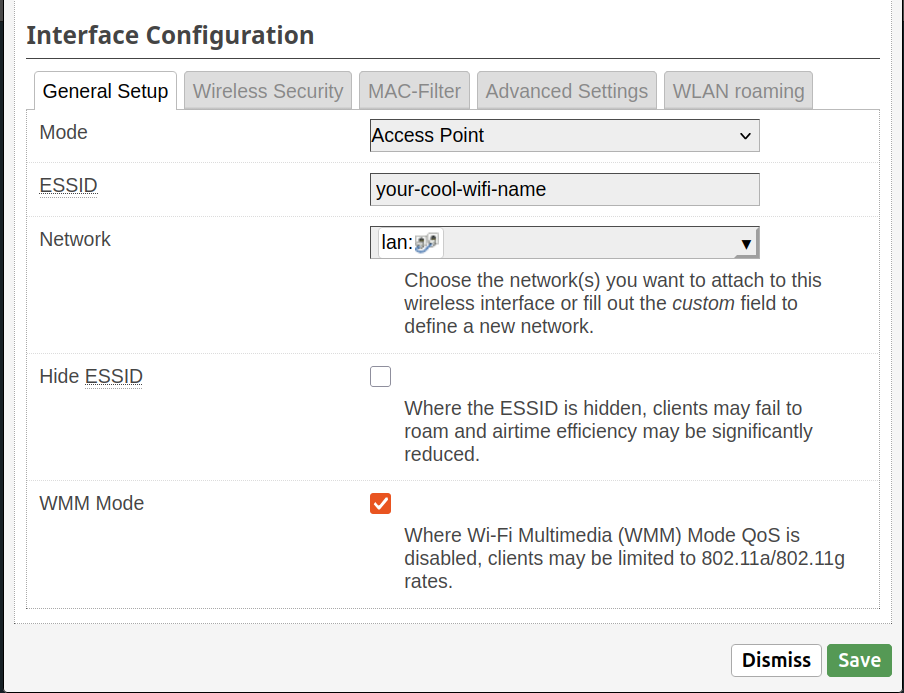
Setting Up WiFi
Head under Network > Wireless to configure both your 2.4GHz and 5GHz WiFi bands. Select Edit for each band and customize them as you see fit. (Always best to go with an obscure, strong password!)
Once done, save changes and make sure the bands are enabled. Now unplug your device from the DIR-878 and try connecting to your new WiFi access point. If everything went according to plain, you should be able to connect without issue and have working, wireless internet!
Awesome!
Pi-hole
You could stop following this guide now and have a perfectly functional home network. But one small issue remains: dealing with ads and trackers. If you plan to always use a browser that supports ad-blocking extensions, then maybe the next steps are overkill for you. For me, I prefer to block ads directly at the network level.
So, that’s what were going to do!
My Pi-hole Device
- Raspberry Pi Zero v1.2
- Ethernet adapter HAT
Installing Pi-hole
Since the instructions to install Pi-hole are well documented, I won’t cover that part in this guide. Instead, I will assume you:
- Have Raspberry Pi OS installed and setup on a microSD card
- Followed the instructions to installing Pi-hole on your device
When all of that is setup, connect your Pi-hole via ethernet to the OpenBSD router on the 3rd LAN port (igc2) and boot it up.
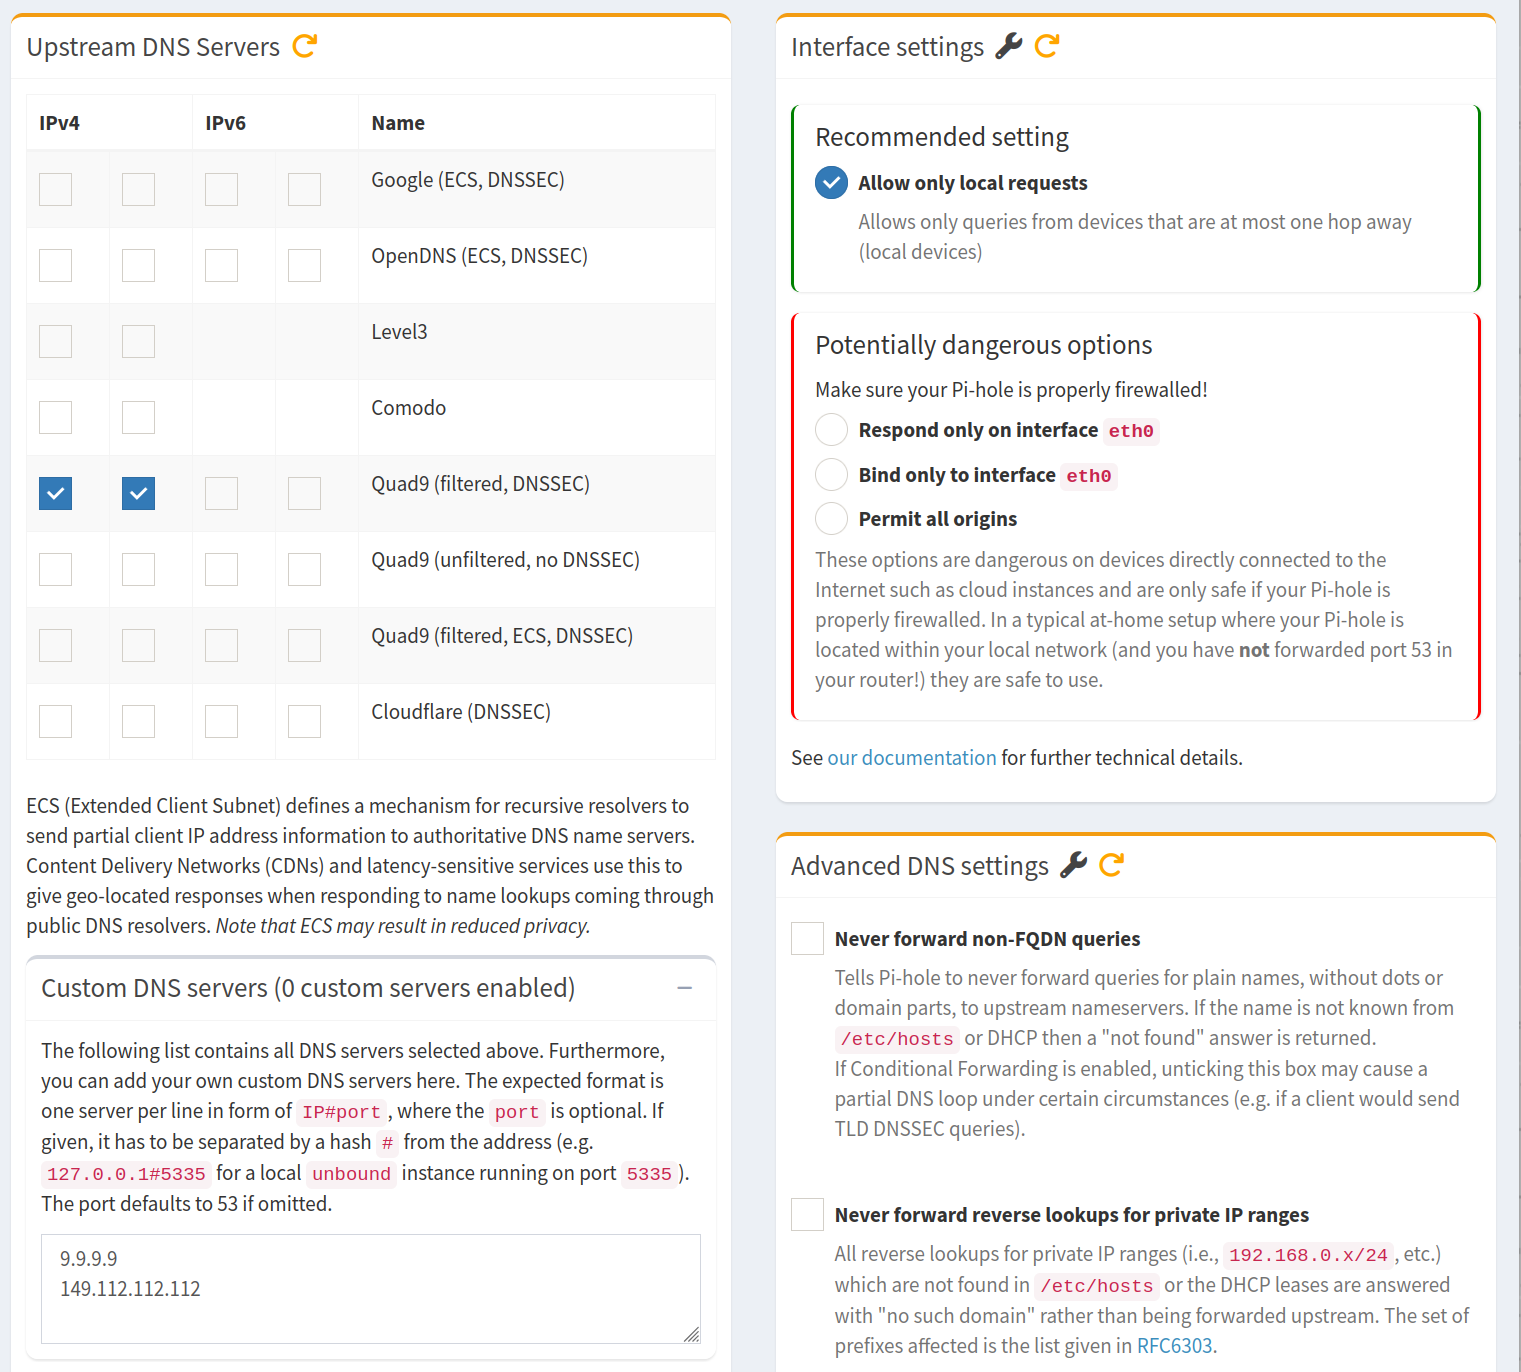
Once the device is finished booting, navigate to 192.168.2.100 in your browser and login to the Pi-hole admin. From there you will want to navigate Settings > DNS and toggle the UI view from “Basic” to “Expert”. Check both IPv4 boxes for Quad9 (or your own preferred fallback) and make sure you uncheck both Never forward non-FQDN queries and Never forward reverse lookups for private IP ranges.
Save changes and reboot the device.
Updating Our Router’s Unbound
Remember that commented out line in our unbound.conf way at the beginning of this guide? Time to activate it!
SSH back into your OpenBSD router and edit the /var/unbound/etc/unbound.conf to point to our now active Pi-hole device:
forward-zone:
    name: "."
    forward-addr: 192.168.2.100
    forward-addr: 9.9.9.9
Then restart unbound for the changes to take:
doas rcctl restart unbound
Now check back in your Pi-hole admin to see live updates on blocked queries in the dashboard! Goodbye garbage ads and malicious trackers!
Wrapping Up
That’s pretty much it. With this setup you now have a fairly secure OpenBSD router paired with an OpenWrt access point and network-wide ad-blocking. I know glancing at a guide like this might seem daunting, but it becomes more manageable once you break things down into more digestible chunks!
Happy home networking!