Starlink, OpenWrt, and Eeros… Oh My!
2025-06-29
In my previous post, Setting Up Pi-Hole with Eero on Starlink, I broke down how to implement - you guessed it - Starlink running through a PiHole connected to my mesh eero wifi nodes. That setup still works and runs well, but I wanted to take a stab at setting up my own router system.
I got my hands on a D-Link DIR-878 A1 Router (say that ten times fast…), which supports OpenWrt. If you’ve never heard of OpenWrt before you should check it out. It’s an incredible project and helps bring life into a lot of older embedded devices that have since lost support from their respective companies. Any projects that help reduce e-waste are good in my books!
Required Equipment
For the purposes of the guide, I will assume that you have:
- Starlink setup and running
- The official Starlink Ethernet adapter (if your model requires it)
- An Ethernet hardware switch
- An OpenWrt supported router (D-Link DIR-878 A1)
- A laptop with an ethernet port (or dongle)
- Eero router(s)
Getting Started
This guide also assumes that you have already completed the following:
- Placed your Starlink into bypass mode
- Connected your Starlink router to your Ethernet hardware switch
- Properly flashed OpenWrt to your supported router
- One or more eero WiFi devices
Configuring our Eeros
I’ve found that setting up the Eeros devices before running our main OpenWrt router makes things easier down the line. Simply walkthrough the default install instructions provided by Eero. It’s pretty easy to follow, and I have to give credit to Amazon for a pretty solid user experience.
Once you’ve configured your wireless SSID and added all your nodes to the same network, you can enable bridge mode.
Bridging Our Eeros
Now we need to update our Eeros to work as “dumb” AP nodes. In order to do this, connect to your newly created SSID, open the Eero app, navigate to Settings → Network Settings → DHCP & NAT, and select Bridge. Click save and your Eeros will request a reboot. While they are rebooting, disconnect their ethernet cable from the hardware switch (we will come back to this later).
With that done, you can move on to setting up your OpenWrt router.
Hooking Up the OpenWrt Router
Connect an ethernet cable between your router’s main port and your ethernet hardware switch. Then connect your laptop via ethernet to a separate port on the router as well.
Plug in the power cable to your OpenWrt router and boot it up. Follow the guidelines when setting things up during your first login (setting up root passwords, etc.). For reference, you can find the main UI of the OpenWrt admin at the default 192.168.1.1 IP.
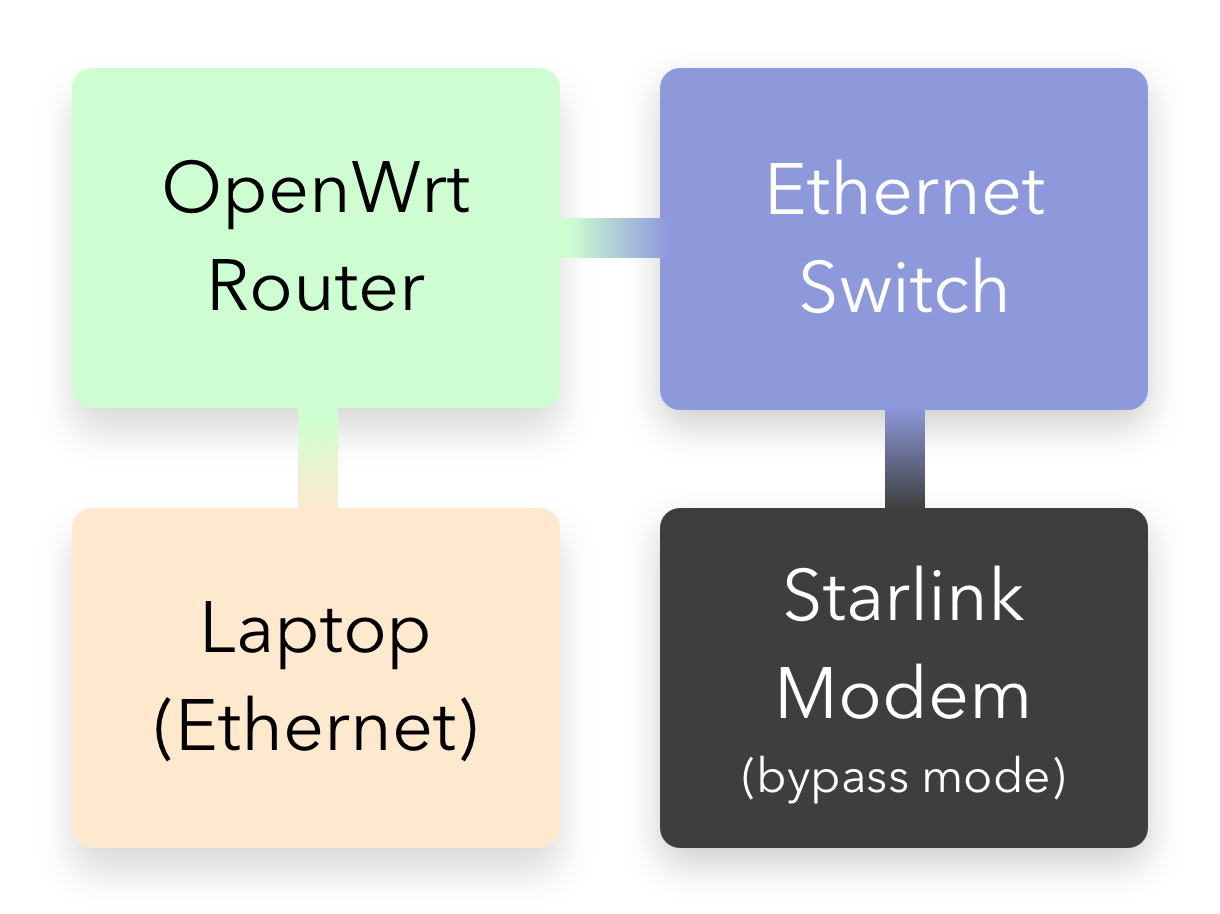
Once the initial setup is finished, you’ll need to connect the main gateway Eero via ethernet to a port on the OpenWrt router. (I told you we would return to this!).
If everything was setup properly, you should have working WiFi based off the original SSID you setup with the Eeros. Congrats!
Extra Packages for QoL
I don’t use a good amount of these myself (mostly stick to adblock / luci-app-adblock pairings) but the following packages are a good starting point.
You install/manage these packages under System > Software.
Networking & DNS
luci-app-upnp- UPnP support via web UIluci-app-ddns- Dynamic DNS (e.g., DuckDNS, No-IP)luci-app-adblock- DNS-based ad blockingluci-app-wireguard- Web UI for WireGuard configluci-app-banip- IP blocking based on threat feeds (IP sets)luci-app-https-dns-proxy- DoH (DNS over HTTPS)dnscrypt-proxy2- DNS encryption + filteringopenvpn-openssl/wireguard-tools- VPN client/server support
Security & Firewall
luci-app-firewall- UI for configuring firewall rulesluci-app-sqm- Smart Queue Management (QoS)tcpdump- Packet analyzer for diagnosticsnftables- Advanced firewall engine (for newer builds)
Monitoring & System Info
luci-app-statistics- Graphs for bandwidth, CPU, etc.collectd- Backend for statistics collectionluci-app-vnstat- Bandwidth monitoring per interfaceiperf3- Network throughput testing
I also highly recommend installing and switching over to the “original” admin theme named OpenWrt. The current bootstrap default is fine, but I find the overall UX of the original much cleaner. You can switch themes under System > System > Language & Style.
Future Improvements
I would love to move away from using Eero mesh nodes, since they are owned by Amazon and “phone home” quite a bit. The reason I haven’t ported over to something more privacy-respecting is simply laziness. I would need to sell my existing nodes (trying to avoid more e-waste), as well as purchase new hardware and setup everything again.
Happy networking!